Implementing continuous integration CI and continuous deployment (CD) on a monorepo is quite complex due to the diversity of multiple responsibilities between developers and the need to coordinate multiple packages. This article introduces the benefits of a monorepo integrated to a CI/CD pipeline. It tests and deploys such an application using Travis CI.
In the previous article discussing unit testing, we used Mocha and Should.js to create unit tests. They were execuded on our local machine. Continuous Integration is the practice of automating the execution multiple tasks, including unit tests execution, whenever a commit is pushed to a remote Git repository. The CI/CD pipeline executing the tests provides feedbacks, helps the integration of features and automates the deployment of new releases.
This article is part of a series relative to JS monorepos best practices:
Running all tests at once
The lerna run command is handy when it comes to running the same Yarn or NPM command across all the packages it manages. The lerna run test executes the test command from every package when it is registered.
A test script in the root package.json file registers the yarn test command:
{
  "scripts": {
    "postinstall": "husky install",
    "test": "lerna run test"  }
}
CI/CD activation between GitHub and Travis CI
The project repository used to illustrate the serie of article is a hosted on GitHub. This article integrates the project with a CI/CD plateform to automate the execution of tests and to publish new releases to the NPM registry.
The CI/CD plateform is Travis CI. Travis used to be free for all open source projects without any limitation. However, after a recent acquision and the objective to increase profits (no judgement here), this offer has been restricted. Since the end of 2020, Travis CI now provides a free plan for Private & Open-Source Repos but it is limited to 10000 Credits. To learn more about Travis CI pricing, check our their plans.
There are multiple CI/CD platforms you can choose. We choose Travis because we have a long history of using it and for the quality and simplicity of the plateform. The steps presented below are similar for alternative solution. In a follow up article, we will achieve the same results with GitHub actions.
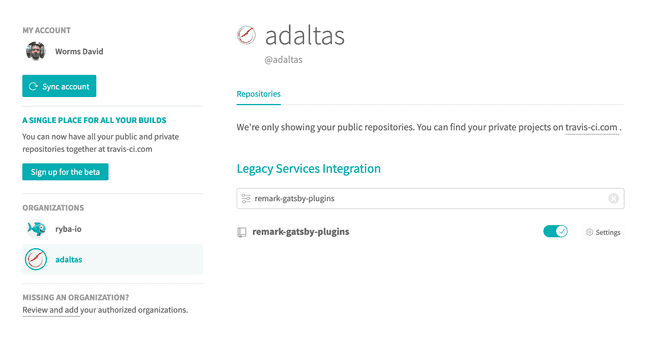
To use Travis CI, you don’t need to create an account, just sign in with your GitHub account. Once logged in, go to your settings page where your repositories are synchronized from GitHub. If you don’t find your repository, click the “Sync account” button below your name. You shall now be able to find your repository and to activate it.

To instruct how to execute the tests on the platform, Travis CI searches for a .travis.yml file at the root of the project. Our file is simple:
language: node_js
node_js:
  - '14'
cache:
  yarn: true
  directories:
    - "node_modules"
script:
  - yarn test
The yarn test on Travis CI is triggered once we push the change remotely on GitHub:
echo '!.travis.yml' >> .gitignore
git add .gitignore .travis.yml package.json
git commit -m "build: travis activation"
git push
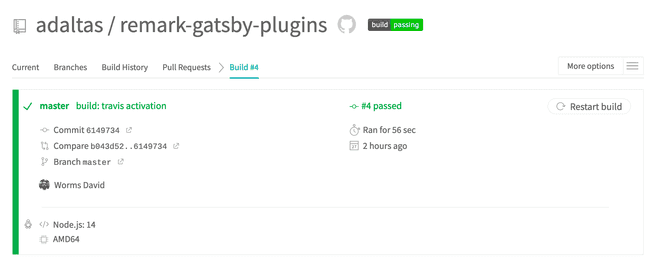
On completion, the Travis CI screen informs about the success of the execution.

Communicate about the CI status
You can insert a Travis CI badge on your readme file or on some other location. It indicates the status of your current build:
<a href="https://travis-ci.org/#!/adaltas/remark-gatsby-plugins">
  <img src="https://api.travis-ci.org/adaltas/remark-gatsby-plugins.svg" alt="Build Status" />
</a>
In Markdown, the badge looks like:
[](https://travis-ci.org/#!/adaltas/remark-gatsby-plugins)Running Travis CI locally with Docker
You can obtain a fully reproductible environment of your Travis Docker environment. A few weeks ago, we share details instructions to re-create the same Travis Docker container on your local machine.
Continuous delivery
Tests are now executed on every build. Assuming a new version is present in the current commit, we can issue the lerna publish command from within the CI/CD platform.
With Lerna, we can use both the lerna publish from-package and lerna publish from-git commands. I find the second one is better. It looks for the version tag in the current commit. If present, it extracts the version and publishes a new release on an NPM registry.
Let’s consider our package ready to graduate and the prerelease cycle is exist. For example, we want our title-to-frontmatter package to graduate from 1.0.0-alpha.3 to 1.0.0.
Travis CI must first be configured to deploy the package. Edit the travis.yml by adding:
before_deploy:
  - echo "//registry.npmjs.org/:_authToken=\${NPM_TOKEN}" >> $HOME/.npmrc 2> /dev/null
deploy:
  provider: script
  script: "yarn run publish"
  on:
    node: "14"
    tags: true
The on property is to condition the execution of the deployment to the version of Node.js, in case we test against multiple versions, and the presence of tags in the current commit. The deployment only occurs when all conditions are met.
The provider and script properties indicate the usage of the custom command yarn run publish to deploy our package. The package.json file is updated to reflect the latest command:
{
  "scripts": {
    "postinstall": "husky install",    "publish": "lerna publish from-git --yes",
    "test": "lerna run test"
  }
}
Let’s commit the changes:
git commit -a -m 'build: publish script'Deploying a package on the NPM registry requires user credentials. Of course, we do not want to share our credentials on a public repository. Even on a private repository, you shall never store any sensitive information such as password, secrets and certificates. Instead, we make use of environment variables configured in Travis CI. The good thing with environment variables when they are well declared, they do not have to appear in log files.
The NPM_TOKEN value is obtained from your NPM account. Go to “Access Tokens” page and click the “Generate New Token”. From the list, select the “Publish” type. NPM states that the “Automation” token is “suitable for CI/CD workflows” but it just didn’t work for me. I believed this is because 2FA is not yet activated on my account.
Copy the value and paste it in the ‘Settings > Environment Variables’ section of the project in Travis CI:

The project has a new deploy instruction and the NPM_TOKEN variable inside it is registered in Travis CI. We are now ready to deploy the new version. The lerna version command offers the --conventional-graduate flag:
lerna version --conventional-commits --conventional-graduate
info cli using local version of lerna
lerna notice cli v3.22.1
lerna info versioning independent
lerna WARN conventional-graduate all packages
lerna info Graduating all prereleased packages
lerna info Looking for changed packages since gatsby-caddy-redirects-conf@0.1.0-alpha.3
lerna info ignoring diff in paths matching [ '**/test/**' ]
lerna info getChangelogConfig Successfully resolved preset "conventional-changelog-angular"

Changes:
 - gatsby-remark-title-to-frontmatter: 1.0.0-alpha.3 => 1.0.0
 - gatsby-caddy-redirects-conf: 0.1.0-alpha.3 => 0.1.0

? Are you sure you want to create these versions? Yes
lerna info execute Skipping releases
lerna info git Pushing tags...
lerna success version finished
The packages are now officially available to the community.
Cheat sheet
- Add a
testscript in the rootpackage.jsonfile registers theyarn testcommand:{ "scripts": { "postinstall": "husky install", "test": "lerna run test" } } - Create a
.travis.ymlfile at the root of the project to instruct how to execute the tests on the platform:language: node_js node_js: - '14' cache: yarn: true directories: - "node_modules" script: - yarn test - Commit the changes:
echo '!.travis.yml' >> .gitignore git add .gitignore .travis.yml package.json git commit -m "build: travis activation" git push - Add the badge to the README.md:
[](https://travis-ci.org/#!/adaltas/remark-gatsby-plugins) - To deploy the package, edit the
.travis.ymlby adding:before_deploy: - echo "//registry.npmjs.org/:_authToken=\${NPM_TOKEN}" >> $HOME/.npmrc 2> /dev/null deploy: provider: script script: "yarn run publish" on: node: "14" tags: true - Add a script to the
package.json:{ "scripts": { "postinstall": "husky install", "publish": "lerna publish from-git --yes", "test": "lerna run test" } } - Commit the changes:
git commit -a -m 'build: publish script' - The
NPM_TOKENvalue obtained from the NPM “Access Tokens” page. Select the “Publish” token or the “Automation” token if 2FA is activated. Copy the value and paste it in the ‘Settings > Environment Variables’ section of the project in Travis CI.
Conclusion
We went over how to implement a continuous integration workflow in your monorepo using Travis CI as well as how to make a continuous delivery work process to deploy your package on the NPM registry.
Recently, Travis CI raises questions from the open source community about the future of its open source support. It follows their recent announcement about changes to Travis CI pricing. As a response, they ensured that “resources are available to all developers and teams as well as improvements to the overall performance and stability of the platform”. But that is simply not what’s going on. For example, the CI/CD pipelines of our open source projects started with a few hours delays. As far as anyone can tell, they are offering free minutes in fixed monthly allotments. There are only so many total minutes they are willing to give out. These changes where initiated in 2019 when Travis CI was acquired by Idera, a private equity firm. It remains however a great platform for non open source projects.
In the next article, we cover CI/CD using GitHub Actions, a tool that makes it easy to automate software workflows.


